Tuesday Tutorial: Pool Noodle Horses
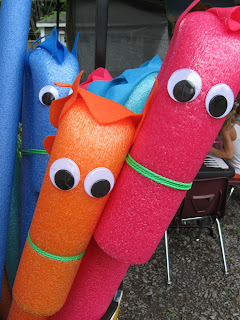
A few weeks ago I helped a friend make pool noodle horses for a western themed party. I first saw the idea on Pinterest in 2013 while preparing for Kingdom Rock (medieval themed VBS). The original inspiration and tutorial can be found at Mrs. King's Music Room: Making Swimming Noodle Ponies.
Tip:
Storing pool noodle horses can be a challenge. We had 12 horses for Kingdom Rock and found storing them in a new (clean) garbage was best. To add to the theme I printed a "royal stable" sign that the kids thought was hilarious.
Supplies:
- larger (thicker) pool noodles. It was harder to find the large pool noodles this year. We tried four stores before success at Canadian Tire.
- rope or cord. This is to keep the head folded in place and act visually at a bridal. The first time we used a green plastic type yarn meant for macro-may. We used hemp on the most recent horses.
- googly eyes. We found the largest googly eyes at Michael's.
- felt (9x12). This is for the ears and hair. I liked the felt to match but any colour will do.
- adhesive. This is preference, in 2013 we used low-heat hot glue guns. The recent horses were made with extra strength glue dots.
- an extra set of hands. It is probably possible to make the horses by yourself but I found step one went smoother with someone holding and the other person tying.
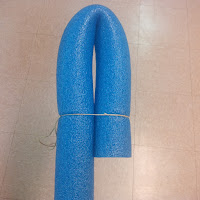
Step 1: Fold and Tie the Head
One person needs to bend the top of the noodle down to the desired horse head size. The second person will wrap the cord around and tie it tight. I used Mrs. King's suggestion and left some cord to act like reigns.
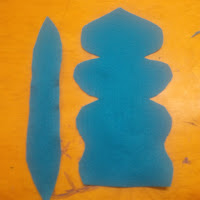
Step 2: Prepare the Felt
One sheet of felt makes the ears and mane for one horse. I cut a 2 inch strip for the ears and the remaining felt for the hair.
Step 3: Cut the Ears and Manes
To make the ears I folded the "ear strips" in half so that the short ends lined up and cut triangles.
The "mane felt" was folded so that the long ends lined up before cutting the design. In 2013 all the horses had the same style mane. This year I gave each on an original look.
I think I liked how the orange and pink turned out the best. I forgot to take pictures of the blue pony.
Step 4: Attach the Eyes, Ears, and Manes
Eyes: add your adhesive to the back of the eyes and place them where they look the best. I find the hot glue worked best. Two year's later most of the horses still have their eyes while the glue dot eyes fell off before the end of the party.
Ears: I slide the ears between the body-head gap then wiggled the felt into place. To have the ears stay up I added glue along to the sides of the ears to stick to the noodle. With the felt the hot glue and the glue dots worked about the same.
 Mane: I added a row of adhesive down the centre of the mane and then attached it to the top of the noodle.
Step 5: Let the Kids Have Fun.
Ideas, Tips, and Final Thoughts:
- If I made another set I will use a combination of adhesives. Defensively hot glue for the eyes.
- If you are going to be using your noodle horses in a pool I would suggest trying a fabric other then felt. Water and felt do not get along.
- I already gave my storage suggestion (garbage can) at the top of the page. Do you have a different method for storing your pool noodle horses? Please share in the comments.
- If you want to see more Tuesday Tutorials you can find them all here.


Comments